“
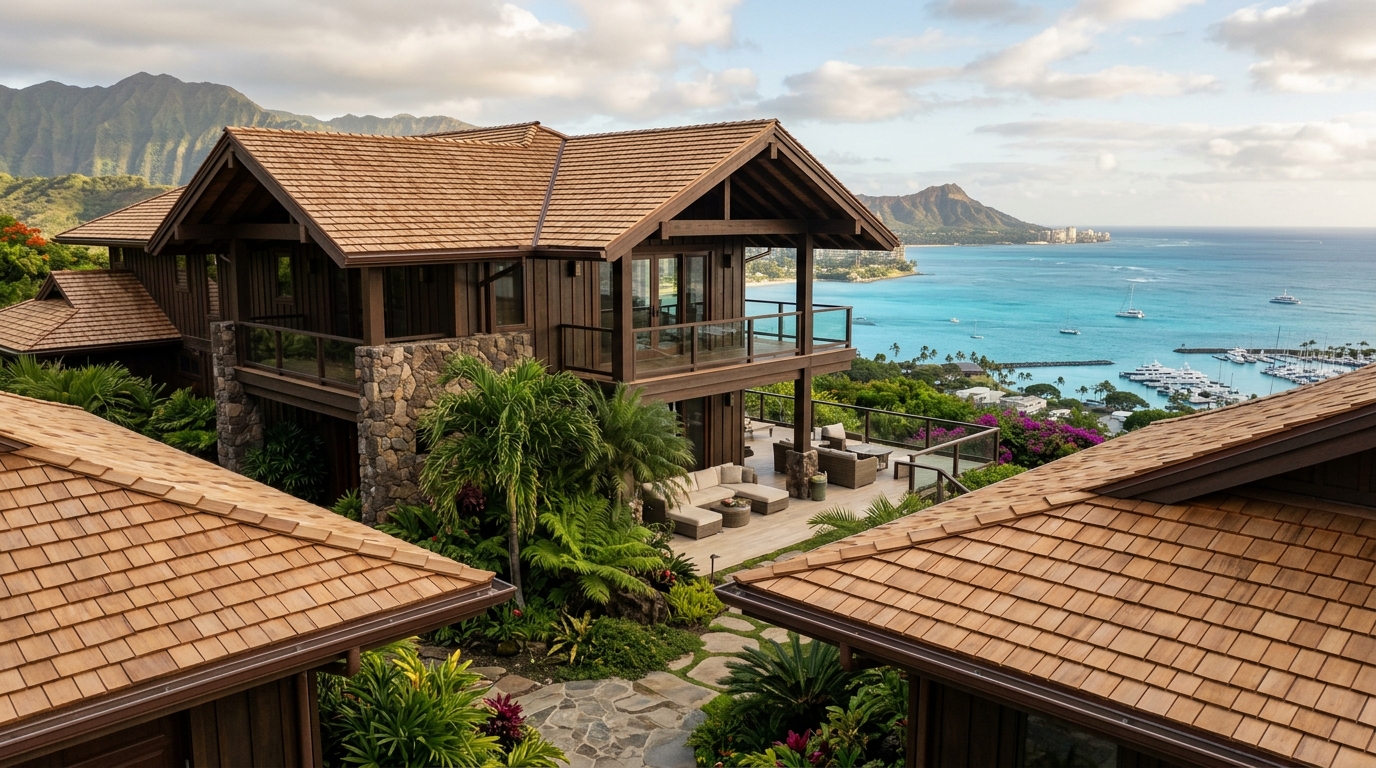
Choosing a roofing contractor in Hawaii Kai means finding a team that truly understands our unique coastal climate. It’s not just about keeping the rain out; it’s about battling relentless UV rays, corrosive salt air blowing in from Maunalua Bay, and designing a system that can withstand hurricane-force winds. After more than 20 years as a general contractor here on Oʻahu, I can tell you that a roof installed in Hawaii Kai faces challenges that a mainland contractor would never even consider. The wrong materials or installation techniques can lead to a roof failing in as little as five to seven years, while a properly executed job can last for decades.
\n\n
Many homeowners think roofing is a straightforward trade, but here in the islands, it’s a science. The constant exposure to salt spray means standard galvanized fasteners and flashing will rust out in a few years, creating entry points for water. The intense sun bakes and cracks low-quality asphalt shingles, and the threat of high winds requires a structural approach to fastening that goes far beyond standard building codes elsewhere. This is why experience matters so much. At Warrior Construction, we’ve spent decades perfecting our approach to tropical roofing, learning from every project and seeing firsthand what works and what doesn’t in our demanding environment.
\n\n
This guide breaks down everything a Hawaii Kai homeowner needs to know in 2026. We’ll cover realistic costs you can expect to pay, how long the entire process actually takes (including permitting and shipping), the specific climate challenges you need to plan for, and how to vet a contractor to ensure you get a roof that protects your investment for the long haul.
\n\n\n\n
Why Hawaii Kai Homeowners Trust Warrior Construction for Roofing
\n\n
When you hire a roofing contractor, you’re not just buying materials; you’re investing in the expertise and reliability of the team installing them. For Hawaii Kai homeowners, this choice is particularly critical. We’ve built our reputation at Warrior Construction (License BC-34373) by being more than just installers; we’re building science experts who understand the specific microclimate of East Honolulu. We live and work here, so we know firsthand how the morning sun hits Koko Head and how the trade winds carry corrosive salt inland.
\n\n
Our approach starts with a deep understanding of local conditions. A roof that performs well in Mililani might not last half as long in Portlock. The primary difference is the salt-air corrosion. We’ve seen countless roofs fail prematurely because the previous contractor used standard galvanized steel nails or flashing. That hardware starts to rust almost immediately, creating weak points that lead to leaks and panel lift-off in high winds. For every roofing project we undertake in a coastal area like Hawaii Kai, our standard practice is to use 316-grade stainless steel fasteners and heavy-gauge, Kynar 500-coated metal flashings. It’s a more expensive material upfront, but it prevents catastrophic failure down the road. It’s a decision born from experience, not from a textbook.
\n\n
Furthermore, our status as a licensed general contractor gives our clients a significant advantage. A roofing project often uncovers hidden issues like rotted fascia boards, compromised roof sheathing from old leaks, or even termite damage in the rafters. A dedicated roofer might have to stop work and tell you to hire another contractor to fix the structural issues. Our team can handle it all seamlessly. We can assess the structure, perform necessary repairs, and then install the new roof, all under one contract and one point of responsibility. This integrated approach saves time, money, and a lot of headaches. For example, on a recent project in Kuliʻouʻou, our roof tear-off revealed significant dry rot in the roof trusses. We were able to engineer a repair, get it approved by the Department of Planning and Permitting (DPP), and execute the structural work without delaying the project for weeks trying to coordinate with another company.
\n\n
We believe in transparency and education. A well-informed client makes the best decisions for their home. That’s why we take the time to explain the pros and cons of different materials, from architectural shingles to standing seam metal and tile, specifically in the context of the Hawaii Kai environment. We want you to understand not just what you’re buying, but why it’s the right choice for protecting your home and family for the next 30 years or more.
\n\n\n\n
What Does a Roofing Contractor Cost in Hawaii Kai?
\n\n
Let’s get straight to the point: roofing in Hawaii is expensive, and Hawaii Kai is no exception. In 2026, you’re looking at costs that are significantly higher than mainland averages due to shipping, specialized labor, and the necessity of using premium, corrosion-resistant materials. Anyone giving you a rock-bottom price is likely cutting corners you’ll pay for later. A proper roof replacement is a major capital improvement, so it’s crucial to budget realistically.
\n\n
For a typical 2,000-square-foot, single-story home in Hawaii Kai, here’s a breakdown of what you can expect to pay for a full tear-off and replacement:
\n\n
- \n
- Architectural Asphalt Shingles: This is the most common entry-level option. For a quality, Class A fire-rated shingle with algae resistance (a must in our humid climate), expect to pay between $12 to $18 per square foot installed. For our 2,000 sq. ft. example home, this comes out to roughly $24,000 to $36,000. While affordable, their lifespan in Hawaii Kai’s intense sun and salt air is typically only 15-20 years.
- Standing Seam Metal Roofing: This is the system we most often recommend for coastal homes. A 24-gauge steel panel with a high-performance Kynar 500 (PVDF) finish offers the best protection against corrosion and wind uplift. The cost is higher, ranging from $25 to $35 per square foot installed. For the same 2,000 sq. ft. home, the total project cost would be $50,000 to $70,000. The benefit is a lifespan of 40-50+ years and superior performance.
- Concrete or Clay Tile: Tile roofs offer a classic look and excellent durability, but they are heavy and require the roof structure to be engineered to support the load. The cost is comparable to metal, running from $20 to $30 per square foot installed. The total would be $40,000 to $60,000. The main consideration is ensuring your home’s framing can handle the weight, which might add to the cost if reinforcement is needed.
\n
\n
\n
\n\n
Here’s a quick comparison table for clarity:
\n\n
| Material Type | Estimated Cost per Sq. Ft. (2026) | Lifespan in Hawaii Kai | Salt Air Resistance | Hurricane Wind Resistance |
|---|---|---|---|---|
| Architectural Shingles | $12 – $18 | 15-20 years | Fair | Good |
| Standing Seam Metal (Kynar) | $25 – $35 | 40-50+ years | Excellent | Excellent |
| Concrete/Clay Tile | $20 – $30 | 50+ years | Excellent | Very Good |
\n\n
Several other factors will influence your final price:
\n
- \n
- Tear-Off and Disposal: Removing and disposing of one or more old roofing layers adds labor and fees.
- Roof Complexity: A simple gable roof is far less expensive than a roof with multiple valleys, dormers, and steep pitches.
- Structural Repairs: If we uncover rotted sheathing or fascia boards, those repairs will be an additional cost. We always budget a small contingency for this, as it’s very common in older Hawaii homes.
- Permit Fees: The Honolulu DPP charges for the building permit, which is a necessary part of the budget.
\n
\n
\n
\n
\n\n
When you get an estimate from our team at Warrior Construction, it will be a comprehensive, line-item proposal that details all of these costs so there are no surprises. We believe in providing a clear financial picture from day one.
\n\n\n\n
How Long Does a Roofing Contractor Take in Hawaii Kai?
\n\n
This is one of the most common questions we get, and the answer often surprises homeowners. The actual time our crew spends on your roof is only a small fraction of the total project duration. Here in Hawaii, logistics and bureaucracy dictate the timeline far more than the physical labor. A roof replacement project in Hawaii Kai isn’t a two-week job; it’s a two-to-five-month process from signing the contract to the final inspection.
\n\n
Here’s a realistic timeline for a full roof replacement in 2026:
\n\n
- \n
- Planning & Permitting (4 to 8 weeks): This is the first and often longest phase. After you sign a contract, we create the necessary plans and documents for the permit application. We then submit them to the Honolulu Department of Planning and Permitting (DPP)[1]. Despite some process improvements, the DPP is perpetually backlogged. We have to wait for a plan reviewer to be assigned and approve the project. There is very little we can do to speed this up; it’s simply the reality of construction on Oʻahu. We manage the entire process, but patience is key.
- Material Ordering & Shipping (6 to 10 weeks): This phase often runs concurrently with permitting. Almost all roofing materials, especially specialized metal panels and accessories, are manufactured on the mainland. They have to be ordered, fabricated, packaged, and then shipped across the Pacific. Ocean freight is slow and can be unpredictable. We’ve seen shipments get delayed by weeks due to port congestion in Long Beach or Honolulu. We order materials the moment the contract is signed to get them in the pipeline, but we are at the mercy of island logistics. This is a critical factor mainland homeowners never have to consider.
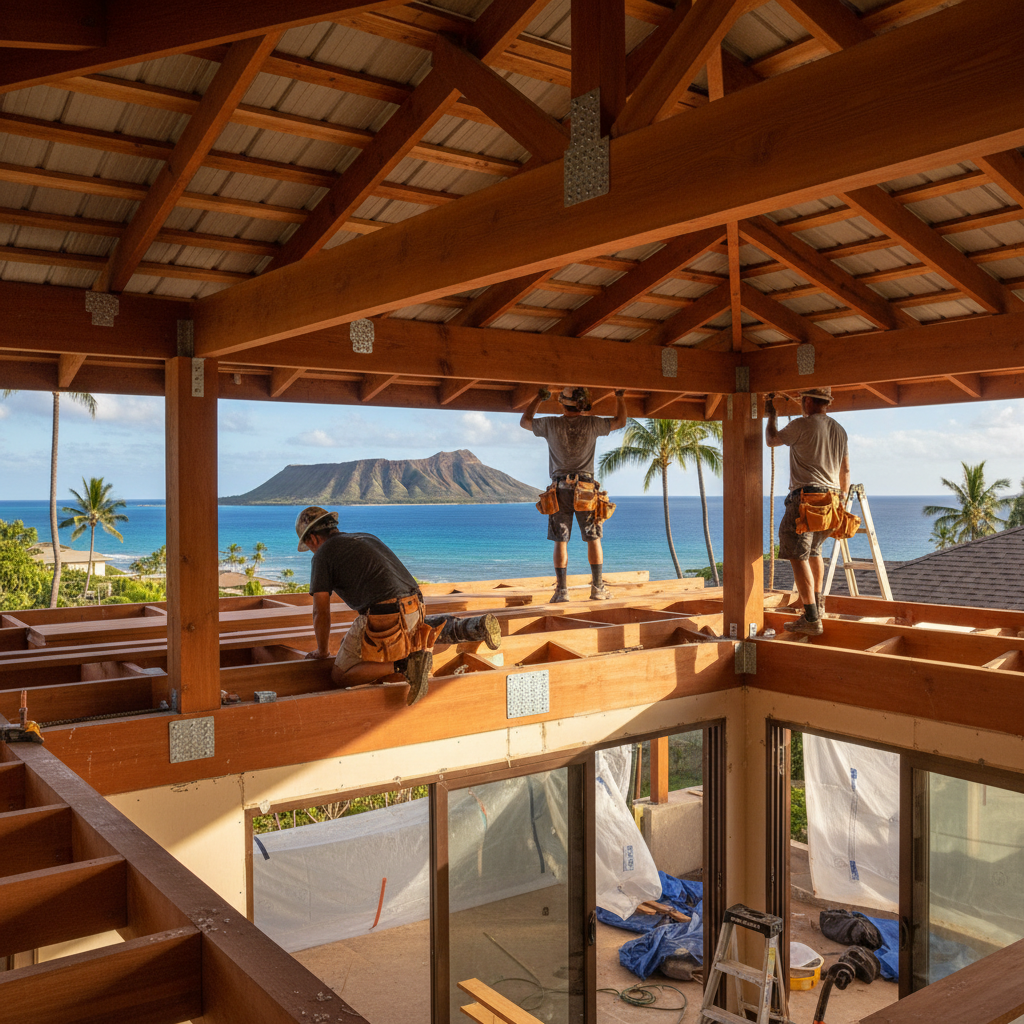
- On-Site Work (1 to 2 weeks): Once the permit is in hand and materials have arrived on-site, our crew can finally get to work. For a standard-sized home, the process is efficient:\n
- \n
- Day 1-2: Tear-off of the old roof and disposal.
- Day 2-3: Inspection of the roof deck, replacement of any damaged sheathing, and installation of underlayment.
- Day 4-8: Installation of the new roofing material (shingles, metal, or tile), flashings, and vents.
- Day 9-10: Final detailing and thorough site cleanup.
\n
\n
\n
\n
\n
- Inspections & Finalization (1 week): After our work is complete, we have to schedule a final inspection with the DPP building inspector. Once that passes, the permit is closed, and the project is officially complete.
\n
\n
\n
\n
\n\n
Total Estimated Timeline: 12 to 21 weeks.
\n\n
It’s essential to have this realistic timeframe in mind. A contractor who promises to start next week is either not pulling a permit or doesn’t have your materials yet. Our process at Warrior Construction is built around transparency. We provide you with a project schedule upfront and keep you updated on the status of your permit and material shipments so you always know where things stand.
\n\n\n\n
What Permits Do You Need for Roofing Contractor in Hawaii Kai?
\n\n
Navigating the permitting process with the Honolulu Department of Planning and Permitting (DPP) is a crucial step that a professional roofing contractor handles on your behalf. For any homeowner in Hawaii Kai, understanding the basics is important to ensure your project is compliant and safe. Attempting to bypass this process can result in stop-work orders, fines, and major problems when you eventually sell your home.
\n\n
First, let’s clarify when a permit is required. According to DPP regulations, you need a building permit for:
\n\n
- \n
- A full roof replacement (re-roofing) where you are tearing off the old roofing material down to the sheathing.
- Any roofing work that involves structural repairs or alterations, such as replacing rafters, trusses, or a significant portion of the roof deck (sheathing).
- Adding a second layer of roofing material. While generally a bad idea in our climate due to trapped heat and moisture, if you were to do it, it would require a permit.
\n
\n
\n
\n\n
You generally do *not* need a permit for minor roof repair, like replacing a few blown-off shingles or sealing a leak in a flashing, as long as the total area being repaired is small (typically under 100 square feet) and there’s no structural work involved.
\n\n
The permit application process is something we, as your licensed general contractor, manage from start to finish. It involves submitting architectural drawings or roofing plans that show the materials to be used, the method of attachment, flashing details, and confirmation that the new roof will meet current hurricane code requirements for wind uplift. This is not something a homeowner can typically do on their own. The DPP requires a licensed contractor, like Warrior Construction (BC-34373), to be listed on the permit as the responsible party.
\n\n
A critical part of the process is the series of inspections. A DPP inspector will visit the job site at key milestones, typically:
\n\n
- \n
- After Tear-Off: The inspector will want to see the condition of the roof sheathing and framing before it gets covered up. This is when any required structural repairs are verified.
- Mid-Roof (sometimes): For complex roofs, an inspector might check nailing patterns or underlayment installation.
- Final Inspection: Once the roof is complete, the inspector will do a final review to ensure all work matches the approved plans and meets code.
\n
\n
\n
\n\n
Passing these inspections is non-negotiable for closing the permit. A closed permit is your official record that the work was done correctly and legally. This is vital for insurance purposes and for the future sale of your property. Choosing a contractor who is licensed, insured, and has a long history of successfully pulling permits with the Honolulu DPP is one of the most important decisions you’ll make.
\n\n\n\n
Hawaii Kai-Specific Considerations: Climate, Materials, Regulations
\n\n
A successful roofing project in Hawaii Kai isn’t just about good craftsmanship; it’s about making smart choices tailored to our specific environment. Overlooking these local factors is the single biggest mistake we see homeowners and less experienced contractors make. Here are the critical considerations our team at Warrior Construction plans for on every Hawaii Kai project.
\n\n
1. Aggressive Salt-Air Corrosion
\n
This is, without a doubt, the number one enemy of any building component in Hawaii Kai. The constant onshore breeze carries a fine mist of saltwater that settles on every surface. For a roof, this means any exposed metal is under constant attack. Standard galvanized steel, which might be fine in Central Oʻahu, will show signs of rust within a year or two here. This includes not just roofing panels but also the nails, screws, clips, and flashings that hold the system together. Once a fastener corrodes, it loses its holding power, making the roof vulnerable to wind uplift.
\n
Our Solution: We have a non-negotiable standard for coastal projects. All fasteners must be 316-grade stainless steel. For metal roofing, we exclusively use panels and flashings with a Kynar 500 (PVDF) coating, which is a high-performance paint finish chemically engineered to resist salt spray, chalking, and fading from UV radiation.
\n\n
2. High Wind and Hurricane Code
\n
Hawaii is in a hurricane zone, and building codes reflect the lessons learned from storms like Iniki. Your roof is the first line of defense. The building code specifies requirements for wind uplift resistance, which dictates everything from the thickness of your roof sheathing to the type and spacing of nails used to attach it to the trusses. Hurricane straps, which tie the roof structure to the walls of your home, are also a critical component that we inspect and often upgrade during a re-roofing project.
\n
Our Solution: We build every roof to meet or exceed the current hurricane code standards. This includes specific nailing patterns (e.g., 6-inch spacing on all edges of the sheathing), using ring-shank nails for superior grip, and ensuring all flashing and roof edges are secured to withstand 100+ mph wind loads. This may slightly increase the cost, but it’s essential for safety and peace of mind.
\n\n
3. Intense UV Exposure and Heat Gain
\n
The sun in Hawaii Kai is relentless. It degrades materials and heats up your home, driving up air conditioning costs. Asphalt shingles, especially darker colors, absorb a massive amount of solar radiation, which accelerates the breakdown of their petrochemical components and makes them brittle over time.
\n
Our Solution: We strongly advocate for “cool roofing” principles. Lighter-colored materials reflect more sunlight. Many modern metal roofing products are certified by the Cool Roof Rating Council (CRRC) and have high Solar Reflective Index (SRI) values. Choosing a light bronze, beige, or even a classic white standing seam metal roof can reduce the surface temperature of your roof by up to 50 degrees, leading to significant energy savings over the life of the roof.
\n\n
4. Homeowners Association (HOA) and Community Covenants
\n
Many neighborhoods in Hawaii Kai, from Mariners Cove to the Portlock area, are governed by strict HOAs with architectural review committees. These associations often have specific rules about the types of roofing materials and even the specific colors that are permitted. You can’t just install whatever you want.
\n
Our Solution: Part of our pre-construction service is to help you navigate this process. We will review your HOA’s design guidelines and prepare the necessary material samples and documentation for you to submit for approval. Ignoring this step can lead to costly fines and being forced to remove a newly installed roof. We’ve seen it happen, and it’s a heartbreaking and completely avoidable situation.
\n\n\n\n
How to Choose the Right Roofing Contractor in Hawaii Kai
\n\n
Choosing the right team is the most important decision you’ll make for your roofing project. A great roof installed by a bad contractor will fail, while a standard roof installed by an expert crew will perform for decades. Here in Hawaii, a contractor’s local reputation and verifiable credentials are everything. Here’s a checklist to follow when vetting a roofing contractor in Hawaii Kai.
\n\n
1. Verify Their License and Insurance
\n
This is non-negotiable. Any contractor you consider must have a valid Hawaii C-42 specialty license for roofing, or a B-General Contractor license like ours (Warrior Construction, BC-34373), which allows us to perform roofing and any associated structural repairs. You can and should verify any contractor’s license status on the Hawaii Department of Commerce and Consumer Affairs (DCCA) Professional & Vocational Licensing (PVL) website[2]. Also, ask for certificates of insurance for both General Liability and Worker’s Compensation. If an uninsured worker gets hurt on your property, you could be held liable.
\n\n
2. Demand Local, Relevant Experience
\n
Don’t just ask if they’ve done roofing before. Ask specifically, \”How many roof replacements have you completed in Hawaii Kai, Kaimuki, or other coastal East Honolulu communities in the last five years?\” A contractor based in Kapolei might do great work, but they may not have the same depth of experience with the salt-air challenges we face on this side of the island. Ask for addresses of past projects so you can drive by and see their work for yourself.
\n\n
3. Get a Detailed, Itemized Proposal
\n
A one-page estimate with a single bottom-line number is a major red flag. A professional proposal should be several pages long and break down the costs clearly. It should specify:\n
- \n
- The exact make, model, and color of the roofing material.
- The type of underlayment to be used.
- Details on flashing, fasteners, and ventilation.
- Costs for labor, materials, permit fees, and disposal/dumping fees.
- The payment schedule.
- A clear statement on how unforeseen issues, like rotted wood, will be handled (e.g., a price per linear foot or per sheet of plywood).
\n
\n
\n
\n
\n
\n
\nThis level of detail protects you and ensures you are comparing apples to apples when looking at different bids.
\n\n
4. Understand the Warranty
\n
There are two types of warranties: the manufacturer’s warranty on the materials and the contractor’s warranty on the workmanship. The material warranty covers defects in the product itself, but it can be voided if the contractor doesn’t install it according to the manufacturer’s strict specifications. The workmanship warranty is the contractor’s promise to stand behind their installation. Ask for how long it lasts (a minimum of 5 years is a good standard) and get it in writing. At Warrior Construction, we provide a robust workmanship warranty because we are confident in our installation methods.
\n\n
5. Check for a Real Local Presence
\n
In the wake of storms or during busy seasons, we sometimes see ‘storm chaser’ contractors from the mainland set up temporary shops. They might offer low prices, but they will be gone in a few months, leaving you with no support if a problem arises. Look for a contractor with a physical office in Hawaii, local phone numbers, and a long-standing history in the community. Your best bet is always a contractor who will still be here years from now to service their warranty.
\n\n\n\n
Real Hawaii Kai Roofing Contractor Project Example
\n\n
To make all of this tangible, let’s walk through a recent project we completed for a family in the Mariners Ridge neighborhood of Hawaii Kai. This example showcases the typical challenges and solutions we encounter.
\n\n
The Property: A 2,600-square-foot, two-story home built in the early 1990s. The original concrete tile roof was failing. Many tiles were cracked, the underlayment had completely disintegrated from decades of heat, and the homeowners were dealing with multiple active leaks every time it rained. The constant salt spray had also corroded all the original valley flashings.
\n\n
The Homeowner’s Goal: The clients wanted a permanent solution. They were tired of temporary patches and wanted a roof that would last for the rest of their time in the home, improve their energy efficiency, and stand up to hurricane threats. They also wanted to modernize the look of their home.
\n\n
Our Recommendation and Process:\nAfter inspecting the roof and the attic space, we determined that the roof trusses were in good shape and could support a new system. Given their goals, we recommended a complete tear-off and replacement with a 24-gauge standing seam metal roof system from a reputable manufacturer, finished in a light bronze Kynar 500 coating to maximize solar reflectivity.
\n\n
- \n
- Pre-Construction: We handled the HOA submission, which included material samples and color chips. After getting approval, we submitted the plans to the Honolulu DPP. The permit process took about seven weeks.
- The Work: Once the permit was issued and materials arrived, our crew was on-site. The tear-off of the heavy concrete tiles was labor-intensive. As expected, we found about 20% of the plywood sheathing had delaminated or had water damage and needed to be replaced. We installed a high-temperature, self-adhering \”ice and water shield\” underlayment over the entire roof deck for a secondary water barrier—a step up from standard felt paper. Then, the new metal panels, custom-fabricated flashings, and ridge vents were installed using stainless steel clips and screws.
- The Outcome: The on-site work took just under two weeks. The new roof completely transformed the home’s appearance, giving it a clean, modern aesthetic. The homeowners reported an immediate and noticeable drop in their summer electricity bills—about 15-20%—due to the cool-roof properties of the new system.
\n
\n
\n
\n\n
Project by the Numbers (2026):
\n
- \n
- Total Roof Area: ~2,800 sq. ft. (accounting for pitch)
- Total Cost: Approximately $85,000. This included the full tear-off, disposal of heavy tile, sheathing replacement, the premium metal roof system, and all permit fees.
- Total Duration: 15 weeks from contract signing to final inspection passed.
\n
\n
\n
\n\n
This project is a perfect illustration of a comprehensive roof replacement in Hawaii Kai, where the investment provides not just a leak-free home, but also improved energy efficiency, aesthetic value, and long-term peace of mind.
\n\n\n
What this means for Hawaii homeowners
\n
For a homeowner in Hawaii Kai, navigating a roof replacement in 2026 requires a focus on long-term value over short-term savings. The unique environmental pressures of our coastal community mean that cutting corners on materials or installation is a recipe for premature failure and costly future repairs. Your roof is arguably the most critical component protecting your home, and the investment should reflect that.
\n
Here are the key takeaways you should focus on:
\n
- \n
- \n Budget for Quality Materials: Do not opt for standard, mainland-grade materials. In Hawaii Kai, investing in Kynar 500-coated metal, high-grade architectural shingles with algae resistance, or properly installed tile is essential. Most importantly, insist that your contractor uses 316-grade stainless steel fasteners for everything. This is a small percentage of the total cost but has an enormous impact on the roof’s lifespan.\n
- \n Plan for the Extended Timeline: Understand that from the day you sign a contract, it will likely be 3-5 months before your new roof is complete. This is normal for Hawaii. Be wary of any contractor who promises a faster turnaround, as they are likely skipping the critical permitting or material procurement steps. Plan your project well in advance of the rainy season.\n
- \n Hire a Licensed, Vetted, and Local Contractor: Your contractor’s experience with coastal Hawaii conditions is paramount. Verify their license with the DCCA PVL[2], check their insurance, and ask for references specifically within Hawaii Kai or East Honolulu. A general contractor like Warrior Construction is often a better choice than a pure roofer, as we can address any structural issues that are uncovered during the tear-off.\n
- \n Focus on the Entire System, Not Just the Shingles: A great roof is more than just what you see on top. It’s a complete system that includes the underlayment, ventilation, flashing, and fasteners. Discuss attic ventilation with your contractor; proper airflow can significantly reduce heat buildup, extending the life of the roof and lowering cooling costs.\n
\n
\n
\n
\n
\n
Making the right decisions during this process will result in a roof that not only protects your home from the elements but also enhances its value and saves you money on energy for decades to come.
\n
\n\n\n
Frequently Asked Questions About Roofing in Hawaii Kai
\n
Can I just install a new roof over my old shingles?
\n
While technically allowed by code in some cases (one layer only), we strongly advise against it in Hawaii. A \”roof-over\” traps a massive amount of heat and moisture between the layers, which can accelerate the deterioration of both roofs and the underlying wood sheathing. It also prevents a proper inspection of the roof deck for rot or damage. A full tear-off is always the best practice for a long-lasting, reliable roof in our climate.
\n
\n
How much does a simple roof repair cost in Hawaii Kai?
\n
For minor roof repair in Hawaii Kai, costs can vary. Replacing a few blown-off asphalt shingles might cost between $450 and $750. Sealing a leaking pipe flashing or a small section of a valley could run from $600 to $1,200. The cost is driven by the time it takes to safely access the area and properly diagnose and fix the source of the leak, not just patch the symptom.
\n
\n
What is the absolute best roofing material for the salt air in Hawaii Kai?
\n
Hands down, the best material is a 24-gauge standing seam metal roof with a factory-applied Kynar 500 (PVDF) paint finish, installed with 316-grade stainless steel clips and fasteners. This combination provides the highest level of corrosion resistance available for residential roofing. While it’s a significant initial investment, its 50+ year lifespan in a marine environment makes it the most cost-effective solution over the long term.
\n
\n
How can I tell if I need a full roof replacement or just a repair?
\n
Look for widespread signs of aging. For asphalt shingles, this includes extensive granule loss (you’ll see them in your gutters), numerous cracked or curling shingles, or if the roof is over 15-20 years old. For any roof type, multiple leaks in different areas are a strong indicator that the system is failing. If the issues are isolated to one small area, a professional repair might suffice.
\n
\n
Does my homeowner’s insurance cover a new roof?
\n
It depends entirely on the cause of the damage. Insurance typically covers damage from a sudden, specific event like a hurricane, a fire, or a tree falling on your house. It does *not* cover replacement due to old age, deferred maintenance, or general wear and tear. We can help provide the necessary documentation for a claim if the damage is from a covered event.
\n
\n
Is a white roof really better in Hawaii Kai?
\n
Yes, a white or very light-colored \”cool roof\” is significantly more energy-efficient in our sunny climate. It can reduce the roof’s surface temperature by over 50°F compared to a dark roof, which translates into a cooler attic and less work for your air conditioning system. In 2026, many homeowners see a 10-20% reduction in their cooling costs after switching to a properly installed cool roof.
\n
\n
How does the permitting process in Honolulu affect my roofing project timeline?
\n
The Honolulu DPP permit process is the biggest variable in any roofing timeline. As of 2026, expect a minimum of 4 to 8 weeks for a residential roofing permit to be reviewed and approved. This is before any work can begin or materials can be finalized. This waiting period must be factored into your project schedule from the very beginning.
\n
\n
\n\n\n
Protect Your Hawaii Kai Home with an Expertly Installed Roof
\n
Your roof is your home’s most important defense against the unique challenges of our island climate. A properly designed and installed roofing system by an experienced local contractor is one of the best investments you can make. At Warrior Construction, we combine decades of hands-on Hawaii experience with the best materials and building practices to deliver a roof that offers lasting protection and peace of mind.
\n
If you’re ready to discuss your roofing project, our team is here to provide a transparent, comprehensive assessment. Learn more about our approach to building durable, weatherproof homes by exploring our Exterior Envelope & Waterproofing services or contact us today to schedule your free, no-obligation estimate.
\n
\n\n
\n\n
References
\n
- \n
- Honolulu Department of Planning and Permitting
- Hawaii Professional & Vocational Licensing Division
\n
\n
\n